Translate

Tuesday, December 24, 2019

Bite Size Cheesecake Goodness

I know each and every family has its particular "goodie"favorites. This easy take on bite size cheesecakes is one of ours .  I make them often but not every year. I don't know why I don't make them each Christmas since they are incredibly easy and quite good. Guess I am a slow learner sometimes.

For the cheesecakes
24 ounces cream cheese
1 cup sugar
5 large eggs
Mix with a mixer until mixture is smooth. Spoon into mini muffin pans that have been lined with mini paper cupcake liners. Fill the liners completely full.  Bake at 350 for about 15 minutes. Remove from the oven and let sit for 5 minutes. The center will sink slightly.

For the filling
1/2 cup sour cream
1/4 cup sugar
Stir well to mix. Spoon into the depression in the cheesecakes. Return to the oven for another 5 or 6 minutes.  Let cool then refrigerate overnight. Remove the paper liners and return to the fridge until serving time. Put a dollop of your favorite red jelly or jam on top of the filling. I prefer raspberry probably because it looks so pretty, but will admit to using whatever I have opened in the fridge. Serve and enjoy.

And now I am off to do the last of the sweet treats. It is fudge making time and then I can do the kitchen deep clean and get the dining room table set for tomorrow.

I hope none of you are having to run around doing anything but what you want to do today.

Sunday, December 22, 2019

Christmas Repeat

In the same December 1980 Ladies Home Journal I used for the brandy wreath cookies is a recipe for Nanaimo Bars. I had these for the first time at an Alabama/Auburn pre game party when theHub and I were still a very young married couple. We both thought they were sinfully rich and delicious.

My childhood best friend/college roommate's dad was a sportswriter for one of the Birmingham papers and threw this huge shindig each year. We never missed it because it was a lot of fun with incredible food spread throughout 3 rooms alongside oysters and shrimp on the patio. Kathy and her mom spent months trying out new recipes and always had something different that the crowd had never eaten before. I never got her recipe for Nanaimo Bars, but when I saw these in the LHJ I knew I would make them. I just never knew at the time I would make them every single year and that they would become part of an expected tradition. But they did and now this recipe has been shared time and time again with friends and family.

Nanaimo Bars

The Crumb Bottom Layer
1/2 cup butter
1/4 cup sugar
1/4 cup cocoa powder
1 teaspoon vanilla
1 egg
1 1/2 cups graham cracker crumbs
3/4 cup flaked coconut
1/2 cup chopped pecans
Grease a nine inch square pan and set it aside. In a sauce pan cook the 1st 6 ingredients over a low heat stirring constantly until the mixture coats the spoon. Remove from the heat and add the crumbs, coconut and pecans. Press evenly and firmly into the prepared pan.

The Filling
1/2 cup softened butter
3 ounces cream cheese
2 tablespoons instant vanilla pudding mix
1 cup confectioners sugar
2 tablespoons milk
Beat the butter, cream cheese and pudding mix with a mixer until it is smooth and creamy. Add the confectioners sugar  and milk. When it is all blended and creamy spread it over the crumb layer. Pop it in the refrigerator for about 30 minutes.

Chocolate Top Layer
4 ounces semi sweet chocolate (Use the kind that comes in bars or squares rather than chocolate chips)
1 tablespoon butter
In a small double boiler melt the chocolate and butter. Stir to blend then spread over the chilled cream layer. Refrigerate until the chocolate is firm then cut into 1 or 1 1/2 inch squares. Store in the refrigerator.

I save all my Thai take out containers for days like today. They are plastic rectangles, about 2 inches high with snap on lids. They make the perfect goodie storage containers that can be stacked on top of each other in the fridge. TheHub likes them because when using a 9x9 pan there are always 2 pieces that won't fit in 2 containers, which he happily lays claim to.

These are easy to make, delicious goodies. Try them, you might like them, and if not, you can always send them here!


Wednesday, December 18, 2019

Another Holiday Favorite

While I was stuck at home the other day I decided to bake My Beloved Sister's favorite holiday cookies. I found the recipe in an old Ladies Home Journal. (December 1980, to be exact) I am not exactly sure how the magazine even came into my possession. Perhaps it was one Mom hung onto and I snagged it because it had a huge section of Christmas cookies. No matter, it has become my holiday baking go-to and is filled with all kinds of delicious recipes. Now it is not so much a magazine as it is an assortment of loose pages which live most of the year in a binder, but make an appearance a few days each December for me to do some intense baking.

Brandy Wreaths

1 cup butter, softened
3/4 cup sugar
1 egg yolk
2 tablespoons brandy
1 teaspoon vanilla extract
2 1/2 cups flour
1/4 teaspoon salt

Glaze
2 tablespoons sugar
2 tablespoons brandy
1 egg yolk

Cream the butter and sugar in a medium size mixing bowl until light and fluffy. Add the egg yolk and continue to beat it. Stir in the brandy and vanilla to mix well. Add the flour and salt all at once and mix until well combined.
Technically the recipe suggests you cut the dough into quarters and chill it (covered) for several hours. I just think it is a waste of time, but some of you are rule followers so I am including their suggestion. After the dough has chilled (or not, for those of us who are anarchists at heart) Cut each quarter into 16 equal pieces. On a lightly floured surface roll each of the 16 pieces into a "snake" 5-6 inches long. Twist two "snakes" together then form a circle. I use a spatula to transfer them to a parchment covered cookie sheet because I have had too many break when I tried moving them without one. If you do not use parchment it is pretty important to grease your baking sheets. Brush each wreath with the glaze and bake at 325 for 10-11 minutes. Put 3 red hots on the top of the wreath and pop them back in the oven for about a minute and a half or two minutes (Long enough that the red hot will melt enough to stick to the cookie without really melting.
Remove to a wire rack to cook. These will keep for about 2 weeks in an air tight container, or can be frozen for a couple of months.
These little goodies are very tasty and are especially good with a cup of hot tea or a brandy laced egg nog.

If any of you know how to get an ancient issue of this magazine please let me know.  If any of you are magazine hoarders or have a hoarding relative who has this particular issue I would love an intact copy.

Tuesday, December 17, 2019

When The Universe Speaks

Every year at Christmas I declare I am going to make chocolate covered cherries like Mom did every Christmas. It was a yearly thing when I was growing up and involved the entire family. Ok it was really a private declaration, but I do tell myself I will, and every year I get busy and don't get around to it util Christmas Eve and then I just don't do it because it is a messy process and who wants a mess then?

This morning I got a phone call at 7 and it was TheHub letting me know he had walked off for work  with my keys in his suit pocket??? He works on the other side of town and even though he said he would bring them back to me later in the day, I know how he works and something always comes up that requires his attention. I figured he would not be here before mid-day at best (but I honestly was not expecting him at all)

If I was going to be stuck at home I figured it was as good of a time as any to get a couple of Christmas goodies baked, then got hit with a lightning bolt idea. "You have all morning and the ingredients. Make the blooming chocolate covered cherries"

Small jar maraschino cherries, drained
 (I prefer the stemmed ones)

1/2 cup butter, softened (I have used margarine in the past)
2 1/2 cups confectioners sugar
1/2 tablespoon milk (cream or almond milk work as well)
1/2 teaspoon vanilla

Cream the butter then add the confectioners sugar. Beat well with a mixer or strong arm it with a wooden spoon. I don't care which method you use and the end result is the same. I tend to use a wooden spoon only because I like to have the easiest clean up possible, plus I can be delusional and pretend I am burning enough calories while stirring to offset a finished cherry. Add the milk and vanilla and stir to make a thick buttercream. (Almost the consistency of play dough)


This is where the mess begins. Take an amount of the paste about twice the size of your cherries and roll it into a ball, then flatten it into a patty about the size of a chocolate covered mint. The heat from your hands will cause the paste to soften so work quickly.


Place the cherry in the center and kind of pinch it to cover as much of the cherry as you can.


Then roll it into a ball, leaving the stem sticking out of the top of the ball. Place them on a plate but make sure they do not touch. When they are all covered pop them in the refrigerator.


Melt unsweetened*  (Yes, I wrote that correctly) chocolate in a double boiler, or if you are like me put a small coffee mug in a pan of water and put the chocolate in it. This is an imprecise amount. I start with about 3 ounces of unsweetened squares. I use Baker's because that is what I find in the stores regularly. I am sure you can find much better, but since I am just using it for dipping these, the Baker's is perfectly fine. I add a little butter to the chocolate to make it set a little better. My mom used to use paraffin but I try to refrain from ingesting petroleum products. You can use shortening instead of butter but I don't use it so it is something I do not keep.  (The last time I bought any, it stayed in the pantry so long it was rancid)

Now we find the reason I prefer stemmed cherries. I hold the stem and dunk them in the melted chocolate. let the excess drip back into my dipping mug and set them on a wax paper covered baking sheet. That's right! I got on my high horse about not ingesting petroleum products but will use waxed paper. I suppose I could butter parchment paper to create my own, but that is just a step I am not willing to take.

When all have had a chocolate bath and are resting  I stick the cookie sheet in the refrigerator for them to set. When the chocolate is firm I take (peel) them off the waxed paper and store in an air tight container in the refrigerator.

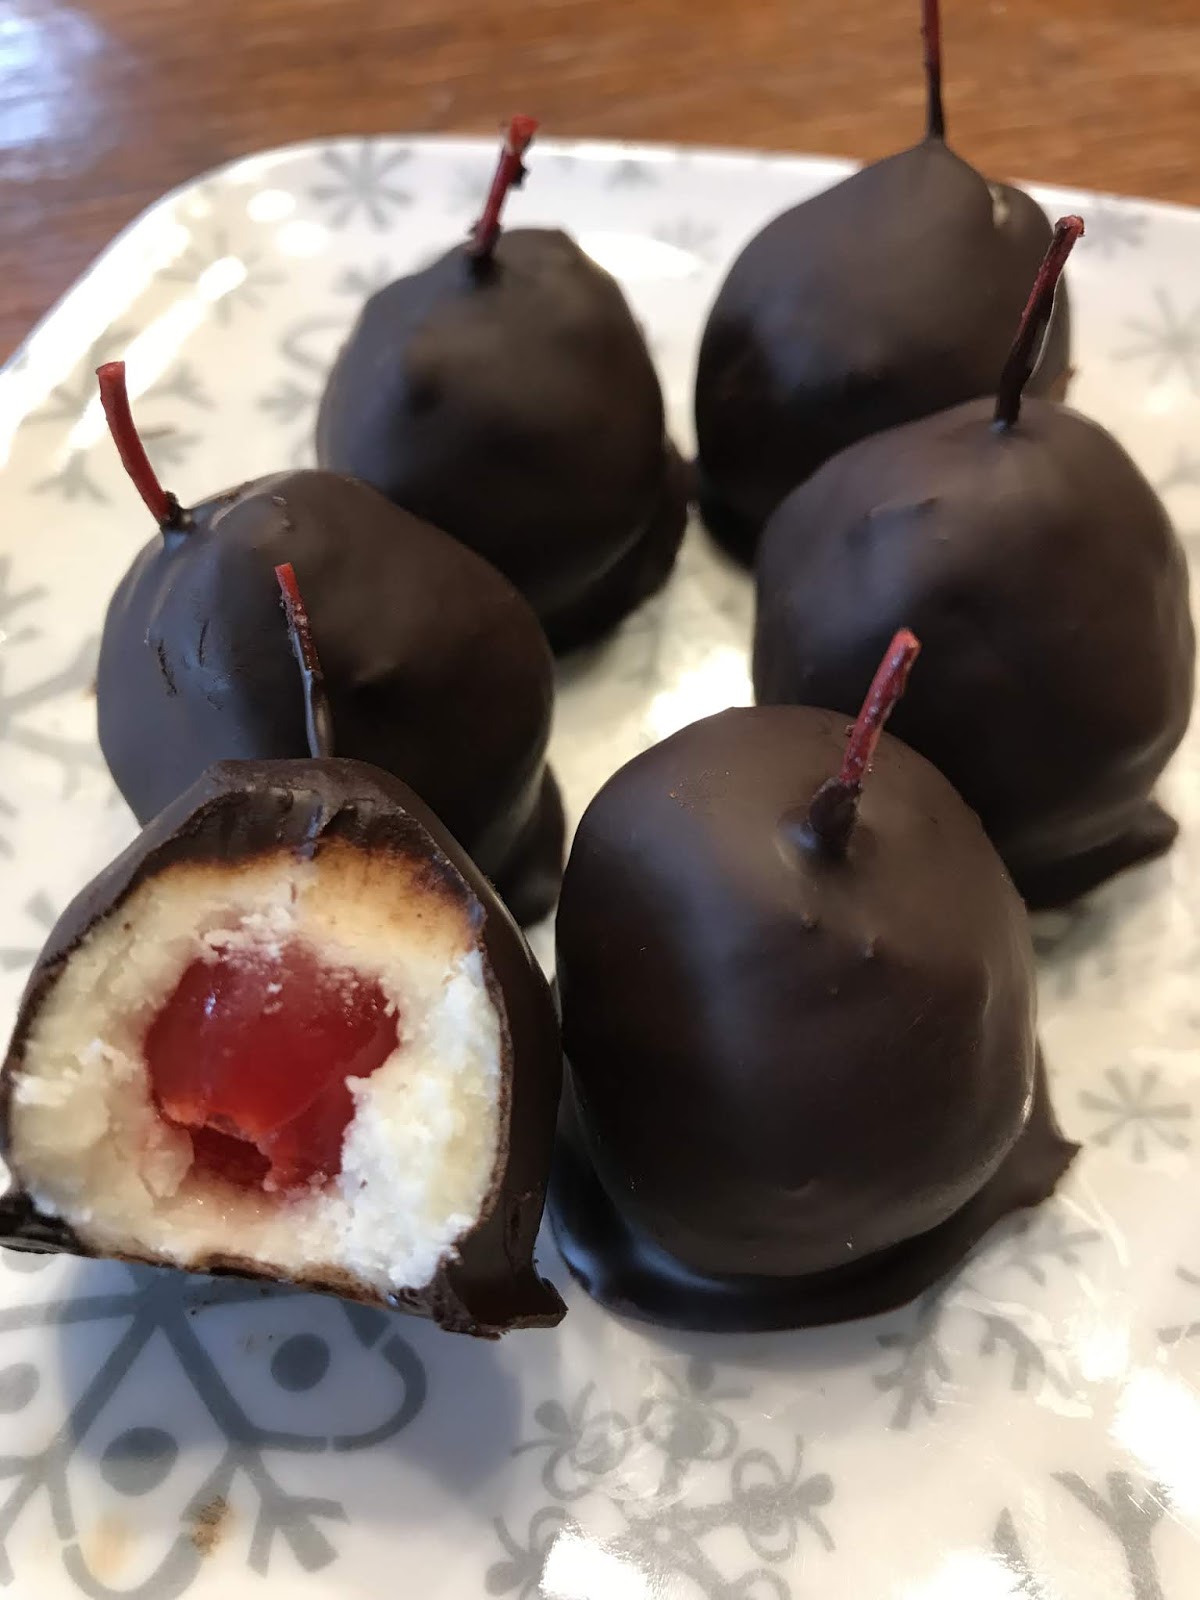
                                                                      The finished product!


   And because I am a selfless human, I sacrificed and bit into one so y'all could see the interior.
        (Also because of the sacrifice and my aversion to wasting food, I HAD to eat it)

And as long as I am dipping and messy I might as well go ahead and dip the pretzels I found in the pantry along with a package of white chocolate bits. 

Wednesday, December 4, 2019

Another Listen

This is a video about the upcoming album A Very Chimytina Christmas filled with holiday sounds. Thought y'all might like to see and hear this very talented bassist again.