Translate

Sunday, May 12, 2013

What A Crock! (Of Deliciousness)

We have all heard those old sayings about not judging books by their cover and how beauty is only skin deep.  Well sometimes that happens with the things we eat also.  The bad thing is we eat first with our eyes.  If it is not visually appealing we are imprinted to think it is not going to be good.  It is most likely a survival mechanism. Through the generations of humankind, aversion to ugly food has kept people from eating all sorts of things that could harm or kill them.

Now that we are in a time separated from our hunter/gatherer ancestors we still rely on our sight to keep food safe.  Who among us has not recoiled at the looks of an almost liquid cucumber  or some plastic entombed leftover that has sprouted blue "fur".  No way we are going to eat that!

But what happens when you cook something that is not only perfectly safe to eat and is also delicious. It just doesn't look terribly pretty.  Well. that is exactly what happened to today's post.  My good friend Lynne told me about this method of cooking a pork butt, and I never intended to use this as a recipe here.  But after one quick taste, it was so delicious I knew I had to share it.

Slow Cooker Pork Butt

1 medium pork butt ( I prefer the bone in variety because it keeps the meat moister)
1 jar adobe sauce (if you want to make the sauce from scratch see here http://mexicanfood.about.com/od/supersalsas/r/AdoboSauce.htm)
1 can chipotle peppers in adobo, chopped. ( Before you add the entire can taste a tiny bit of the pepper. I used only 2 small peppers and it had enough heat for us)
1 Dr Pepper ( 12 ounces maximum)
1 tablespoon agave
juice of 1 lime
1 sliced onion
1 sliced bell pepper

Spray the crock with a spritz of Pam and put the pork butt in the bottom.   In a medium bowl mix all the other ingredients except the vegetables.  Pour over and around the butt.  Cook on high for 6 hours.  Reset the cooking temperature to low and add the onion and pepper.  Cook another hour or so.  (The best thing about a crock pot is the lack of necessity for specific cook times.  As soon as the veggies are soft it is ready to eat.  You be the judge of the time)  Serve over rice, or noodles, or mashed potatoes, or toast, or anything that suits you and yours.


When I made this I diced the onion and pepper and added it at the beginning of the cooking process. It added a good bit of flavor but it became mush.  Next time I will do as I mentioned earlier.  It would look nicer with the different textures of the pepper and the onion visible.  I will just have rings of onion and long slices of pepper for the visual interest.

Even with the mushy veggies this got thumbs up from everyone and will become something I make regularly.  I had a fairly large pork butt so there were tons of left overs.  I shredded the meat and packed it into 2 bags for the freezer.  This is going to also become a regular taco filling for us.  Next time I will buy the largest pork butt my crock pot will hold and make this again specifically to freeze in packages for tacos. I am also going to cook a couple of whole fryers the same way  and shred it for chicken tacos.
Yumlicious!

Winner, winner pork butt dinner!


Tuesday, May 7, 2013

Refrigerator Diving!

Do you ever have one of those days when you get to stay home all day wearing comfortable clothes, hair pulled back and a perfectly clean face?  They are gift days to be enjoyed thoroughly.  I get to listen to whatever music suits my mood and do whatever long neglected chore needs to be done, or do nothing al all if that's what suits me.


Son2 is visiting for a while and in the midst of savoring the day  I thought about dinner for 3.  The Hub is fine with a bowl of Campbell's soup as a punt meal but it's nicer if you have a guest ( even one you birthed) to have something somewhat decent as a meal.  A quick look through the refrigerator didn't help much.  I had a few vegetables, about 1/2 pound of ground beef and some odd leftover bits from previous meals.  I guess I could have changed clothes, fixed the hair and put on a dash of makeup and run to the store for something but I just didn't want to. ( Oh to be one of the beautiful people who can pull off "natural" without scaring small children and domestic animals!)

So the challenge was on.  Make something tasty out of virtually nothing using only what was on hand. 
(1 1/4 cup of leftover brown rice, about 5 tablespoons of cooked pinto beans, 1/2 cup corn, part of an onion, half a jar of salsa, 1/2 pound ground beef, 2 carrots 3 medium bell peppers, 1/2 head of lettuce, 1 tomato and 2 scallions.

I made a quick simple salad with the lettuce, scallions and tomato and set it aside. The rest became __


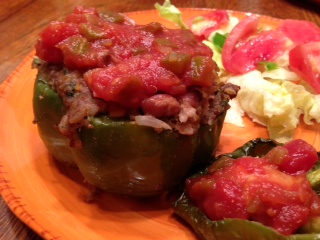
                                               Southwest Stuffed Baked Peppers


3 small to medium bell peppers, tops cut off, seeded and cored
1/2 pound ground beef
1 1/4 cup cooked brown rice
1/2 cup pinto beans
1/2 cup corn
2 carrots grated 
1 small onion chopped finely ( or 1/2 huge leftover onion)
1/4 cup salsa
salt and pepper to taste
1 teaspoon chili powder
1/2 teaspoon cumin
1/2 teaspoon garlic powder

Put the bell peppers upright in a small greased baking pan.  Mix all the remaining ingredients together and stuff it inside the pepper cavities.  Bake at 350 degrees until the peppers are tender but not wilted ( about 30 - 40 minutes)  Before serving warm any remaining salsa and spoon it over the top of the peppers.

They smelled fantastic while they were cooking and the flavor was so good.  There was enough beef so you could taste it and it had a nice mouth "feel".  The beans and corn were great texture compliments .  If I had used only the rice it would have been too mushy.  The onion provided additional flavor and the carrots were there just to take up some much needed space.  I would pretend I added them for the nutrient value, but they were really just filler since I had so little beef. ( Squash, sweet potatoes, zucchini etc would work equally well to stretch the amount).  I thought about it after the fact, but a little grated pepper jack cheese would have been outstanding in the mixture.  I am always a day late with ideas.

The Hub liked this so much he even asked that we do it again.  Not  bad to have something from virtually nothing turn out well.  Try refrigerator diving.  There is no telling what delicious concoction you might create!


Monday, May 6, 2013

Strawbrownie?

I love spring!  Well, I love spring except for the pollen induced sneezles and the crazy southern weather.  I had just finished putting away the remaining few cool weather clothes from my closet when a nice rain ushered in a tad more winter.  Naturally!

The upside of spring is the plethora of wonderful asparagus and really tasty strawberries.  I will not discount winter berries, but nothing compares to walking past a display in the store and having eau de strawberry permeate the air.  It makes my mouth water and makes me buy 3 cartons of strawberries. ( I fully understand I have quantity issues)

I was in the process of enjoying plain berries when I remembered I had a limited time before they turned to mush and no one wants to chomp down on soggy strawberries.  I was in the middle of the freeze or dehydrate dilemma when I opened Pinterest.  Sometimes I believe the angels reside there!

 In  my wanderings there, I always find something that screams at me to try.  I had a quart of strawberries in the fridge and a recipe for strawberry brownies on the computer screen.  It did not take a genius to figure out what would become of them. So here is the result of Strawberry Brownies via Breakfast to Bed  http://breakfasttobed.com/?p=3970.  You might want to check it out.  It is a fun blog to read.


                                                           Strawberry Brownies


1 pound fresh strawberries, washed and hulled or 2 cups frozen berries
1 stick butter
1 1/4 cup sugar
2 cups flour
1/2 teaspoon salt
1/2 teaspoon baking soda
1 teaspoon vanilla
2 eggs, beaten

Preheat oven to 375 degrees

In a saucepan over medium heat, add the butter, sugar and berries and cook until the berries start to soften. ( appx. 5 minutes) Add the vanilla and continue to cook for 2 more minutes.  Mash with a potato masher until the berries are relatively smooth. ( You will have some stringy bits but don't worry about them)
Remove from heat and let cool to lukewarm ( Important to let it cool or the next step will result in cooked eggs in the strawberry mixture.  You might be curious how I know that)  While the berries are cooling sift the dry ingredients together and set aside.  Add the eggs to the berry mix and stir until they are well blended.  Fold in the dry ingredients until they are well incorporated in the berry mixture, but do not beat them until the batter is smooth.  Pour into a greased 9x13 baking dish and cook for 30 minutes or until a skewer inserted in the middle of the pan comes out clean.

As for the verdict, we thought they were more like a cake like brownie than the chewy brownies we prefer.  That being said, the flavor was spectacular.  It was the ultimate spring cake and the addition of some sliced strawberries and a dollop of whipped cream sent it over the top.  I will definitely make it again.  In fact, I am going to try this next week with pineapple rather than strawberries and substituting brown sugar for part of the sugar.  Will let you know how it turns out.  But for now I am going to run.  A cup of coffee and cake are calling my name!


Monday, April 29, 2013

Tequila + Chicken + Citrus Juices + Spices = Dinner

Today was one of those one pot kind of days.   Early this morning I had an inkling of what I was making for dinner.  I intended to have everything in the crock pot by 9 so the house would be filled with smells of deliciousness from about mid day through the evening.  As usual when I try to organize in advance things it usually goes awry.  What is the old saying?  "Want to make God laugh?  Then make a plan." Well I planned, and at about 4:00 this afternoon, I punted.

I had every intention of trying my hand at creating a chili lime chicken that was going to slow cook all day. (While I ate bon-bons and watched soap operas?)  The only thing I remember about how the day turned upside down was when I realized I had no limes.  No problem there, right?  After all The Pig is just about mile and a half down a perfectly straight road from my house.  It was just a matter of getting ready quickly and a quick run to the store.

Except, before I got dressed, I  went in the closet to see what I would wear when I saw about 5 sweaters I had not put up for the summer. ( I envy anyone who has a closet big enough to hold every single item they wear.  I have to adjust seasonally removing one  and putting in another) Well I folded all the sweaters and put them in a basket when I remembered I had not changed over the shoes I store in a shoe bag under the bed.  So I changed winter for spring/summer then noticed an earring that had fallen on the floor when I was trying on a sweater trying to decide if I was going to keep it or send it to Goodwill.  And then I straightened out my jewelry.  And then...

And then it was 4 pm and I still had no limes, so I ran out to The Pig and picked up a couple of limes, saw a jalapeno and thought it might be a tasty addition to the dish too.  By 4:10 I was back at home and grabbed my trusty fake Le Creuset  ( Does anyone actually pay $275 dollars for a pan when you can buy a knock off for $39 and it cooks the same?)

After looking through all the spirits I found I had no tequila ( Probably because no one here ever drinks it, but I usually have some cheap tequila. It comes in a bottle that reminds me of Vitalis.  I use it only for cooking and must have forgotten to replace it.

 I quickly browned a whole fryer in a couple of spoons of oil, coarsely chopped an onion, minced the jalapeno, and smashed 3 cloves of garlic and wilted them in the pan.  Slapped the lid  on it and turned it off the drove to the package store to grab another cheap tequila.  ( The best thing about enamel clad cast iron is that it retains heat and "continues cooking" even when the heat is off.  This was kind of critical today)   45 minutes later I was back with the tequila, a box of granola and a "pillow top" mattress pad.
 ( I am pretty sure I have mentioned before how easily distracted I am)

Long story short, after turning the stove on high, adding the citrus juices and a bit of tequila along with an ample sprinkling of spices, dinner was ready in about 15 minutes  I put the remaining asparagus spears directly on the chicken and let it steam for a few minutes, warmed leftover egg noodles and tossed some lettuce and tomatoes with a wine vinegar dressing and we were ready to eat.
                                               

                                                 Chili Lime Chicken


3 tablespoons olive oil
1 whole chicken fryer, washed and the inside cavity salted
1 jalapeno minced
3 cloves garlic minced
1 onion coarsely chopped
juice of 2 small limes
juice of 1small orange ( Optional but I had it and used it and the orange flavor was a nice addition)
1/2 cup tequila ( Use your own judgement about how "good" to buy.  I use the cheap stuff)
1 tablespoon chili powder
1 teaspoon Mexican Hot Chili powder ( Optional, we like heat)
1 teaspoon dried cilantro ( fresh if you have it)
1 teaspoon adobo seasoning
1/2 teaspoon red pepper flakes

Heat the olive oil in  a pan and brown the chicken, whole.  Put the vegetables in the pan to wilt.  Now this is what I intended to do.  Transfer the chicken to a crock pot and put the wilted vegetables around the bottom of the crock.  Deglaze the pan with the citrus juices stirring to loosen any browned bits.  Add  the tequila and stir to mix.  Pour evenly over the chicken.  Mix all the spices together and sprinkle over every chicken surface that is visible.  Put the top on the slow cooker and cook on low for about 7 hours or high for 4 hours.  How much simpler life would have been if I had just gone to the store early. I could have come home, started the chicken and then been distracted all day, no harm and well done fowl!


Saturday, April 27, 2013

Success And Failure! Oh Nuts!!!!!!!!!!!!!

I have been so busy pinning things on Pinterest that I have not had time to do anything.  That is an outright lie.  We all know we have the same 24 hours in our day, so I guess I have been pinning and doing other things instead of making plaster hands, or vertical gardening, or refashioning tee shirts, or even cooking. To be totally honest I have been mostly out of town lately, coming home to wash clothes, re-pack and leave again.  But I am going to be here a while now so there is no reason for me to sit and pin when I can be doing what I pinned.

Tonight I attempted a recipe I ran across a little bit ago and every time I see it I want to make it.  Tonight was that night.  I ran across the pin from a website called Culinary Concoctions by Peabody http://www.culinaryconcoctionsbypeabody.com/  It is a fun food blog to visit and I really do envy the name.  I wish I had been so clever! Perhaps I can have a renaming ceremony or at least  create a sub-name.
Oh short attention span get back on track! Do not be fooled.  Even though the name of this is bread it is really a loaf cake.  The original recipe is for 2 loaves.  I did not want 2 loaves of deliciousness screaming at me so this has been reduced for just one loaf.
                      (Notice why the cake should be totally cool prior to glazing!)


Almond Joy Bread


2 eggs
1 cup sugar
3/8 cup canola oil
1/8 cup melted unsalted butter
1/2 teaspoon vanilla extract
1/2 teaspoon coconut extract
1 1/2 cups flour
1/4 teaspoon baking soda
1/4 teaspoon baking powder
1/4 teaspoon salt
1/2 cup buttermilk
1/2 cup coconut
1/2 cup chocolate chips
1/4 cup raw slivered almonds

Preheat oven to 350 degrees. Mix 1st 6 ingredients with an electric mixer for 2 minutes and set aside.  In a separate bowl sift the flour, baking powder, baking soda and salt.  Measure the buttermilk.  Mix the flour and buttermilk into the wet ingredients alternating, flour mix, buttermilk, flour mix, buttermilk.  Stir until just well moistened ( like muffins) and add the coconut, chocolate chips and the almonds, stirring enough to distribute them well. Spread mixture into a greased and floured loaf pan (or 4 mini loafs) and bake for 1 hour. ( Important! Use a metal pan instead of a corning or pyrex one. I didn't do that)

Remove from the oven and let rest for about 10 minutes ( Important! I failed to do this) Remove from the loaf pan and put on a rack to cool. (Important!  I didn't do this either)  When cool place on a serving plate and poke holes halfway through the cake all across the top of the cake. ( Important! Do not poke the holes to the bottom of the cake!  I did that)

 Pour coconut syrup ( recipe follows) into the holes on the top of the cake, stopping often to allow the cake to absorb the syrup ( Important!  I didn't do that)  Take a pastry brush and brush some of the syrup over the top of the cake ( I didn't do that either)

Drizzle chocolate ganache ( recipe follows)  over the top of the COOLED cake ( Guess by now you know I didn't do that either!)  Slice and enjoy!

Coconut Syrup ( original)              Coconut Syrup (mine)
1/2 cup sugar                                   1/2 cup sugar
1/4 cup water                                   1/4 cup coconut water
1 tablespoon unsalted butter            1 tablespoon coconut oil
1/2 teaspoon coconut extract

Place ingredients in a small saucepan and bring to a boil.  Allow it to boil for 1 minute then turn the heat off but leave the pot on the burner.

Chocolate ganache
1/2 cup heavy cream
3/4 cup semisweet chocolate chips

Bring the cream to a boil ( nuke it for about 1 minute and 15 seconds)
Pour over the chocolate chips and stir till well blended and smooth.

This was delicious but as you can tell I did several things wrong.  In addition to the mistakes I mentioned above, I was reducing the recipe mentally as I went along.  Since I have the attention span of a gnat, by the time I added the coconut, chocolate chips and the almonds I forgot I was halving everything, so I had way too much for the cake to handle.  The result was a dense heavy loaf rather than a lighter one.  Did it taste bad?  No it was delicious but it was very rich.  Very, very rich!   Another slight problem I had was the coconut syrup.  Again I forgot I was cutting the recipe in half until I had it mixed and already cooking.  No problem right!  Just pour half of the syrup on the cake and no harm, no foul.  Except I had poured all but bout 2 tablespoons on it before I remembered I was supposed to use just half.  So now I had an over dense  super saturated cake. Also I believe I mentioned the need to cool the cake before removing it from the pan and pouring the syrup over it.  I took it out of the oven and immediately poked the holes to the bottom of the pan and poured the syrup over it.  About that moment, I realized when it soaked in I was going to be in trouble getting it out of the pan so I took the blazing hot syrup soaked cake and inverted it onto a plate, then had to flip it over again onto a flat surface ( cutting board).  By the time I did all of that I had cake in about 4 pieces.  For the sake of photographing a loaf shape, it had to be held together with dry spaghetti noodles.  Pay attention to the cooling and syrup application instructions!

You will notice the different coconut syrup recipes.  I do not like the way coconut extract tastes and since I have coconut water in the fridge all the time and have coconut oil in the pantry i decided to use them instead.  The taste was really good, closer to a fresh coconut taste without the bitter aftertaste in coconut extract.

Will I make this again?  Yes but I will pay attention to all of the things I did incorrectly.  Oh my that is such a long list of corrections to pay attention to.  Maybe if I don't see anything sparkly to divert my attention I will be OK.  Or maybe not.  I probably would not place a bet on it!


Thursday, April 25, 2013

Too Cold for Traditional Spring Meals

Last night was another dip in the temperature of what has been a freakishly cool spring.  Traditionally by now the pool should be just about warm enough for swimming and the days should be good for sunning and a little gardening.  Instead, it might be sunny and gorgeous then dip down into the 40's.  I live in Alabama and it is supposed to be full fledged nearly summer right now!

The Hub had planned on hitting a few golf balls at the driving range and then we were going out to eat.  Instead it was drizzling rain and cold, plus the range was closed so dinner plans changed on a dime.  My go to quick meal is to toss something on the grill and have a salad but the rain and cold even canceled that plan.  A quick trip to the freezer found a pound package of Conecuh Hickory Smoked Sausage just waiting patiently.  It only takes it about 1 hour to thaw so that determined what the meal would be.

Normally we cook it on the grill and serve it with a sauce made of melted raspberry jam and jalapeno jelly. Oh my goodness, I can't tell you how outstanding it is!  ( Thank you Elaine for first serving it to us that way.  We have had it many times since!)  Because grilling was out,  I kind of punted and came up with a variation of a dish we often have.

                      Saucisse de pommes de terre et d'oignons sur kraut
                      (sounds better than sausage potatoes, onions and kraut)

1 pound Conecuh Hickory Sausage ( any smoked sausage will do but it will not be as good as Conecuh)
3 medium sized potatoes, well scrubbed and diced
1 medium yellow onion, diced
1/8 teaspoon crushed caraway seed
1/8 teaspoon crushed fennel seed
salt and pepper to taste
15 asparagus spears
small red and orange peppers, sliced in half and seeded
1 jar kraut ( the jarred stuff doesn't develop  a metallic flavor but if that doesn't bother you, use canned)

In a large skillet heat the sausage until it sizzles, remove from the pan and cut it into 2 inch pieces.  Before returning the sausage to the pan add the potatoes and onions and cook them for just a minute so they can pick up a little of the flavor from the drippings of the sausage.  Add the sausage on top of the potatoes and onions and pour 1/2 cup of water over everything.  Sprinkle with salt pepper and the crushed seeds.   Put a light fitting lid on the pan and let it cook over a medium low heat until the potatoes are about half done. ( Check a couple of times and add additional water if the bottom of the pan dries out)  Place the asparagus spears and pepper halves on the sausage, replace the lid and let it cook until the asparagus is steamed and the potatoes are soft  ( about 5 minutes).  While the veggies are steaming heat the kraut in a small pan until it is hot.  To serve, plate the asparagus and peppers to one side.  Using a slotted spoon to drain the kraut, place about 1/2 cup on the bottom of each plate.  Spoon potatoes and onions over it and serve the sausage on top of those.  Eat and enjoy!  It makes a fast, easy meal.

There was about a cup and a half of leftovers that I plan on turning into a weekend breakfast hash by warming it up and topping it with either a poached or fried egg.  Well, I will put the egg on The Hub's.  Personally the only way I can choke down a few bites of egg is if they are well scrambled and I have serious doubts about adding scrambled eggs to hash.

If you live in Birmingham, The Pig in Bluff Park has Conecuh Sausage.  I know they sell it other places and in other towns and states, I just don't personally know where . They also have mail order capabilities from their website.
http://www.conecuhsausage.com/default.aspx

Now I need it to warm up and be sunny for a while.  I really would like to cook summer foods  again!


Wednesday, April 10, 2013

Peanut Butter Bread Pudding?????

I have been flitting about on both coasts the past few weeks  and have eaten at every type of place imaginable.  I have had white tablecloth service, ethnic restaurants, and little hole in the wall joints for various meals.  After a drive from the west coast home I also experienced various McDonald's, Arby's and my first ever trip to Jack in the Box.  (Please try not to envy all those road trip meals.)

I try and remember anything memorable I eat to see if I can replicate it.  In Portland I stayed at The Hotel Monaco.  The Red Star Tavern and Roast House is one of those fortunate coincidences when you have a restaurant with really tasty food in the hotel.  I had a great dinner there and tried one of their signature desserts, Peanut Butter Bread Pudding.  Do I hear a yum?  It was very good and I made mental notes to try it when I finally was home and cooking. (Amazing how soon after a trip you start cooking again!)

Tonight we had a pretty simple stewed chicken and vegetable meal so it was a good time to give it a try.  I  used a basic bread pudding recipe but altered it so we would not have a huge pan of bread pudding.

Peanut Butter Bread Pudding

3 leftover hamburger buns ( or 6ish slices of white bread)
peanut butter
1 1/2 cups milk
2 eggs
1/2 cup sugar
1/4 cup brown sugar
1 teaspoon vanilla

Serves 3 or 4


Grease a 3 or so cup pyrex pan. ( I used an 8x8 pyrex)   I had 3 leftover hamburger buns that I needed to do something with so I spread peanut butter on each half.  I did not measure the amount but use slightly less than you would spread for a peanut butter and jelly sandwich on the inside surface of both the tops and bottoms of the buns.  ( I think the restaurant used true peanut butter bread in theirs but I was not about to bake  bread just for a dessert) After spreading  the bun halves, tear them into bite size pieces and put them evenly in the bottom of  prepared pan.  Mix the milk, sugars, eggs and vanilla well in a small bowl.  Pour over the bread pieces. Turn the oven to 325 degrees and let the mixture sit while the oven heats.  Put it on a small cookie sheet and pop it in the oven for about 45 minutes or until the center is well set.  Let it slightly cool and cut it into squares.  Squeeze a small drizzle of chocolate syrup on the top of the pudding and enjoy!

I thought it was even better than the restaurant pudding.  It had a softer texture and was
a tad peanut butterier ( Real word?  Perhaps not, but at least it conveys the intention).  It probably would have been better if I had taken the time to make an actual chocolate sauce, but I just grabbed the brown squeeze bottle from the fridge and it was fine.  A dollop of whipped cream would have been a nice addition also but I didn't have any and even if I had I probably would not have taken the time to make it.  It was tasty without it, but if I ever serve it to guests I will whip some.

I give this an A for taste and ease of preparation.  Plus it passed The Hub test.  He ate 2 big servings and my success yardstick is anything he finds "seconds" worthy.